Acoustic Baffle / Absorbent Panel Construction Procedure
See the main Eyedrum Acoustics Project page for background info.
Ingredients:
| Item | Purpose | Price/Unit | Units/Baffle | Cost/Baffle | Baffle cross section |
|---|---|---|---|---|---|
| 3/8-inch plywood | structure, improve LF absorption | $12 for 4’x8′ sheet | 2.04’x4′ | $4.00 |
(burlap not shown in photo) |
| Owens Corning 703 compressed fiberglass insulation, two inches thick, unfaced | Acoustic absorption | $0.92/sq-ft | 8 sq-ft | $7.36 x 2 | |
| Polyester batting, 3 ounce weight -OR- Polyester batting, bonded, 1/4-inch thick | keep the fiberglass fibers from getting out | $1.39/yard off 48-inch-wide roll -OR- $8.99/queen-sized sheet (90″ x 108″) | 1.33 yards -OR- 20 square-feet | $1.85 -OR- $3.00 | |
| Fabric cover: white burlap | cosmetic cover | $2.77/yard of 36-inch-wide roll | 2.33 yards | $6.46 | |
| Heavy duty hanging hardware | $3.00? | ||||
| Total | $30.03 |
NOTES:
- The agreed-upon configuration is shown above. See the simple cost calc spreadsheet.
- Cost per panel drops by $6.56 if 1-inch-thick OC-703 is used — but less thickness means less absorption.
- Cost per panel drops by $3.50 if natural (light brown) burlap is used — which is actually better due to a more “open” weave, and the natural color may blend in better with the unpainted wood joist ceiling. However, having met with the architecural consultant, she thinks white panels will look better, and effectively provide a visual “drop ceiling” in the space that we plan to use them in.
- Hardware cost is not known yet — I’m not sure yet how I’m going to hang these. It has to be absolutely safe (we don’t want these things falling from the ceiling), but we don’t want to spend $20 per panel on hardware either. See bottom of page for more information about the hanging hardware.
- Also need to treat burlap with fire retardant. Cost not yet known. Here’s one product. Could also get it done at a commercial cleaners.
- Instead of burlap, if you’ve got the money, you can use real acoustic fabric such as Guilford FR 701. It costs $18 per linear yard (66″ wide), so that’s $30 per panel. Ouch. That’s too much for a DIY baffle project like this, but if you’re interested, order directly from Guilford at 1-800-544-0200.
- The OC-703 is 55% of the cost. Since I’d be buying $500 worth of the stuff (72 panels), maybe I can get that discounted a bit.
- Since we’re building these ourselves, there’s nothing that says we can’t build these panels to custom sizes. Specifically, I’m thinking 2’x6′ (instead of 2’x4′) because that will fit better between the HVAC duct exhausts. But that will have little to no effect on the total material cost.
Tool / Hardware List
In addition to the major items listed above, you’ll need the following:
- drill with assortment of wood bits
- roofing nails with “washers” — (1.75-inch long is OK, 2.00-inch is better)
- regular scissors, measuring tape, flathead screwdriver
- 7/16-inch wrench — box or socket
- power stapler of some sort and staples (7/16-inch T-50 staples are ideal); need about 150 staples per panel; manual staple guns suck.
- a hammer, preferably a small-sized one and a regular-sized one
- hooks for the baffles (should screw to side of wood — try 3.5-inch “rope” hooks)
- screws to attach the hooks to the plywood — 1/4″ x 1″ hex head lag screws (7/16 hex head)
- hooks for the overhead joists (standard screw-in type)
- chain or aircraft cable assemblies (see bottom of page for discussion of that issue)
Baffle Construction Procedure
It takes about 2 man-hours per panel to do this procedure, assuming you know what you’re doing (i.e. this isn’t your first one) and you’ve got all the tools and materials ready. More than half of that time is taken up in affixing the burlap. Due to setup time overhead, it is recommended that you build these in batches, instead of one-at-a-time to completion.
- Cut the plywood down to 24.5″ x 48″ panels — that’s a half-inch MORE than 24″ x 48″. This means you’ll have three per 4′ x 8′ sheet with scrap left over. The extra half inch means you’ll have a 1/4-inch extra for the top and bottom edges, which will support the baffle when resting on the ground — if the fiberglass panels have to support the weight of the panel, they are likely to shear off of the plywood (they won’t be very well attached). Also, it makes the stapling part a lot easier. The rest of this procedure sucks if you use 24″ x 48″ panels — spend the extra buck per panel for the 24.5-inches.
- Drill four 11/64-inch holes in the plywood for the two hooks. The hole pairs should be 8 inches from each side edge (32 inches apart), and the holes should be placed 7/16-inch and 1+9/16-inch from the top edge (1+1/8-inch apart). Which edge is “top” is arbitrary — pick one.


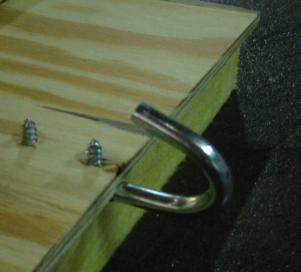
- Get the hooks and remove any pricing labels from them (it’s easier to do it now than to do it later). Attach the hooks using the lag screws. Orient the hook so that it goes “up and over” the edge of the plywood and points down the “back” side. Hand tighten — don’t strip the plywood. The tips of the screws will probably poke through the back side — that’s OK, the fiberglass panel will cover that.
- For the next few steps, be sure to keep your hands away from your face, until you’ve wrapped the fiberglass panels in the polyester batting.
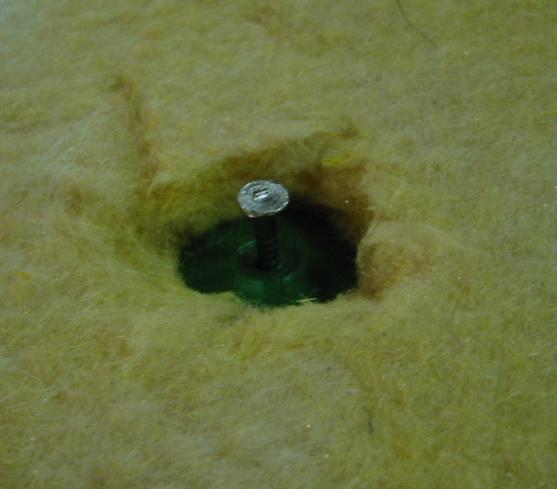
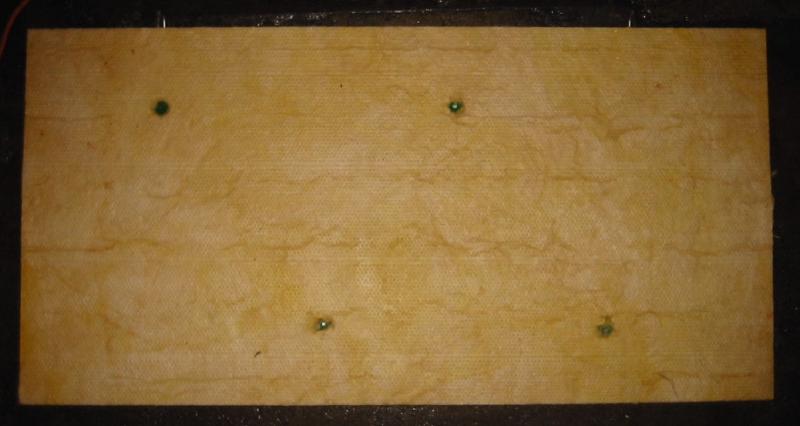
- Place the plywood flat on the ground with the hooks pointing up in the air — so the “back” side will be facing up. Place one of the fiberglass panels on top of it, centered on the plywood. Nail the fiberglass panel to the plywood using four roofing nails with “washers”. 2.00-inch nails are ideal, but 1.75-inch nails will do if that’s all you can find. If the nails are “too short”, help the washer push through some of the fiberglass insulation as you nail it in — push the washer edges with your fingertip; it just shears right through it. Nail in a zigzag pattern as shown at right — this ensures that the nails on the opposite sides of the panel will not collide with each other. Use a few heavy hammer blows, otherwise the nail will bend and you have to try again with a new nail. Pound each nail until it’s just barely through the board. You may have problems with this step if the plywood is warped. After each nail, make sure the fiberglass panel has not shifted.
- Flip the assembly over and attach the other fiberglass panel.
- Cut a 60-inch length of polyester batting (should be 48 inches wide) and lay it out flat on the floor. If you got the queen-sized sheet kind instead of the rolled kind, cut the sheet into three 60″x45″ pieces (with one 30″x45″ piece left over).
- Place batting on top of the assembly so that there is 5 inches of batting extending past the top edge of the assembly (the edge with the hooks) and a little bit extending past the two sides. Tug the batting around until it is straight and lined up with the panel. Smooth the batting against the top edge of the panel — it should stick.


- Lift the panel by the side edges and rotate it in air so that the bottom edge goes up and over, and place the panel back down. Smooth the batting and overlap it with the other batting flap on the top edge of the panel.
Be careful when you move the panel — PICK THE PANEL UP off the floor, rotate it in air, and place it straight down either A) flat on one of its two faces, or B) on its edge so that the plywood touches the floor and supports the weight. If you tilt the panel up off the floor, and/or lean it against a wall, the weight will be supported by the fiberglass panel, and the nails will probably pull out.
As you do this, pay attention to whether the fiberglass panels stay nailed to the plywood. If not, then you’ll need to bash the nails in harder, or use longer nails.
- Trim the batting on the top and side edges. On the top edge, the two batting flaps should be completely overlapped and each should reach nearly all the way across to the far edge (~4 inches).
- Unroll and cut about 110 inches of the burlap. Don’t let the burlap ever get folded (e.g. at any time after cutting it at the store) — it creases easily and the creases don’t come out, like linen. Keep it rolled up, just like they had it in the store.
- Place the burlap on the assembly lengthwise so that there is 5 inches of burlap extending past the side edge (pick a side). Center the burlap vertically so that there is plenty of burlap (8 inches or more) extending past the top and bottom edges. If necessary, skew the burlap so that the grain of the fabric lines up with the edges of the panel.
- Stand the assembly up on the other side edge, bring the burlap up with it. Be careful when you do this — PICK THE PANEL UP off the floor, rotate it in air, and place it straight down on its edge so that the plywood touches the floor and supports the weight.
- On the edge that’s now facing up into the air. trim the burlap so the edge of the burlap is about 1 inch back from the corner of the assembly edge, or about 1 inch beyond the plywood edge.
- Staple the burlap to the plywood edge. Pull the burlap up gently as you do this and keep the tension equal across the edge. Try to run the grain/weave straight, too. Tap the staples in with a hammer if necessary.
- Pick up the panel and rotate it in mid-air so that the remaining burlap is pulled up over the other edge. Make sure the burlap weave parallels the panel edges. Trim the burlap as above.
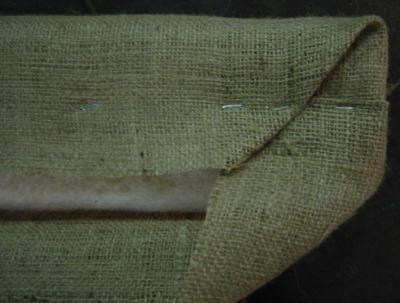
- FOLD THE BURLAP UNDER (about a half inch) and staple it to the plywood. Do this stapling neatly because people will be able to see it. Tap the staples in with a hammer.
- Now rotate the panel so that it is resting on the hooks (upside down).
- Trim the burlap on the bottom edge so there’s 1 inch beyond the plywood, as above. Staple as above, folding the corners like you would wrap a gift. This will be the most visible part of the panel, so work as neatly as possible on this seam. Tap the staples in with a hammer. You may want to use one of the big “heavy duty metal staples” at the two ends (hammered in) because the fabric folds get pretty thick there and can pull regular staples out.
- Pick the panel up and rest it on the bottom edge that you just stapled.
- Staple the burlap to the top edge as above. You’ll need to cut two slits for the the two hooks to poke through.
- Rejoice.
Treat the baffles with fire retardant
The fiberglass panels are basically OK as far as your local fire code goes — look for information about that on the side of the bale of the fiberglass panels. Same goes for the polyester batting, and perhaps even the burlap. But to be safe, you should apply some retardant. I have used Inspecta-Shield, which costs about $25 per 1-quart bottle, and covers about 10 panels.
Vacuum each panel first (to get rid of loose lint) and trim off any loose strings. Then simply spray the liquid on using a spray bottle.
Glue loose burlap
You may want to glue down some of the looser flaps of burlap. In particular, if you are hanging these overhead, they look a lot better if the short diagonal folds of burlap at the corners are creased and glued down. Heavy fabric glue seems to work great for this — I used “Super Thick Tacky Glue” — it’s like white Elmer’s glue just thicker. Any fabric store will carry it. Doing this step really improves the look of the panels.
Hang the baffle
There are three proposed ways to hang each baffle. All three ways have the same four hooks installed on the baffle edge (2 hooks) and on the overhead joists (2 hooks). The baffle hooks are not installed using standard threaded-shank screw hooks — instead, special “side-bolting” hooks are used. This is much more secure — the threaded hooks are likely to eventually pull out of the plywood edge.
The three ways to hang it:
- Hang it right up against the joists, hook to hook.
- Cost: zero
- Pros: cost, no swinging
- Cons: up too high, no height control
- Hang it displaced down from the joists using chain.
- Cost: about $2.00
- Pros: height adjustment is easy; ready to use, no labor required
- Cons: some cost; possible swinging; visually distracting
- Hang it displaced down from the joists using aircraft cable.
- Cost: about $5.00
- Pros: visually subtle; clean lines
- Cons: height adjustment is impossible (need new cable/clamp); cable links are labor intensive to build; high cost; possible swinging
Note that while an extra $3.00 for the aircraft cable solution sounds reasonable, multiply that times 30 panels and you just spent an extra $100. Plus the labor required gets very big when building 60 of them.
The main problem with the chain is that it draws the eye, and you usually want these panels to NOT be noticed. There is black “decor” chain, but it is flimsy and designed for cosmetic/decorative use only. I strongly recommend you use “real” chain, because these will be hanging over peoples’ heads.
One cheap option would be to simply paint the chains white (or black, or whatever you want). In fact, that’s what I ended up doing, and it looks great. Simply dunk each 24-inch length of chain into a can of black paint and hang it vertically to dry. Catch the drippings back into the can for the first two minutes or so. The paint I used was Ace Hardware Indoor/Outdoor Rust Stop — Flat Black (need about 0.4 ounces per chain) and it looked great, certainly from a distance.
More hooks and chains can be used if you want it to be even more secure, or to inhibit swinging. Swinging could also be inhibited by very small string (e.g. fishing line) run from the bottom of the chain to a point away from the panel and under slight tension.
